



Ableton looper plugin control with the Loop4Live
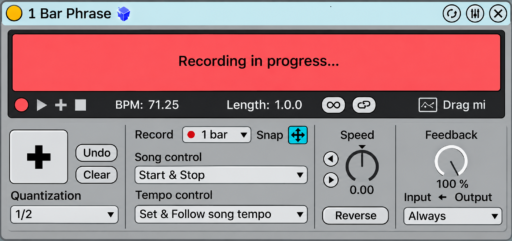
With the MkIII version of the pedalboard, it is possible to control Ableton’s looper plugin via the pedalboard’s free mode. Ableton version 12.1 or higher is required to use certain features.
You can launch recording, switch between overdub and play, stop the track, export to the clip grid in the session view (Ableton Live >= 12.1 only), and clear the looper. Several looper plugins can be controlled.
Video tutorial:
Place the Loop4Live configuration file:
To enable the pedalboard to control the looper plugin, you must place a dedicated free_mode_midi_map file in the Loop4Live HOME folder on your computer. We provide a ready-to-use configuration file available at this address: https://www.loop4live.com/download/?wpdmdl=9153
This file must be placed in the Loop4Live “Home” directory (for MacOS /Users/yourusername/Loop4Live or for Windows C:/Users/yourusername/Loop4Live). Then restart Ableton or reload the configuration with the Max4Live plugin.
Note : If you have changed the MIDI channel used by the pedalboard (with the l4l_config file or the max for live configuration plugin), you must be careful to enter the same value in the looper configuration file we are discussing here: the CHANNEL_NOTE_BUTTONS and CHANNEL_CC_BUTTONS parameters must have the same value as the pedalboard midi channel in scene mode (see the “MIDI Channel” parameter in the configuration, see section 6D.4. Description of the Loop4Live configuration parameters in manual).
If you wish, you can create your own free mode configuration file dedicated to the looper plugin according to your preferences (see paragraph 1. Free mode: Configuration of MIDI notes and CCs assigned to the pedalboard in manual): the notes and cc to be used to control the looper plugin are described there.
Once the configuration file has been saved, configure Ableton as follows:
Ableton configuration:
In the “Audio Effects” section, drag a looper instrument onto a track:
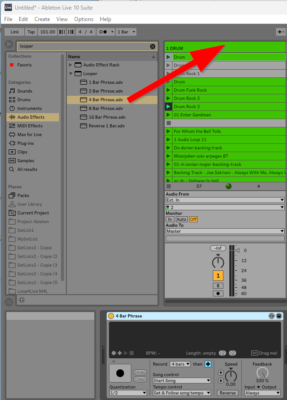
With free mode enabled on the pedalboard (top right button long pressed), the looper plugin is automatically detected by the pedalboard, and the associated LED lights up.
Midi mapping:
You must then “MIDI map” button A-B-C or D on the pedalboard to the looper plugin launch button:
– Enable MIDI map mode (Mac: CMD + m, Windows: Ctrl + m).

– Select the looper launch button:
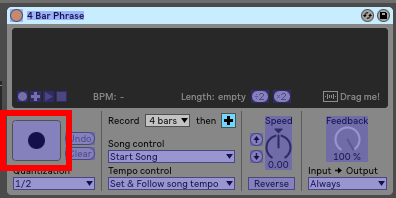
– Press the A-B-C or D button on the pedalboard.
– The controls are now mapped and displayed in the “MIDI Mapping” section on the left side.
– Exit MIDI map mode.
The configuration file we previously saved will program the pedal to respond as follows:
Features:
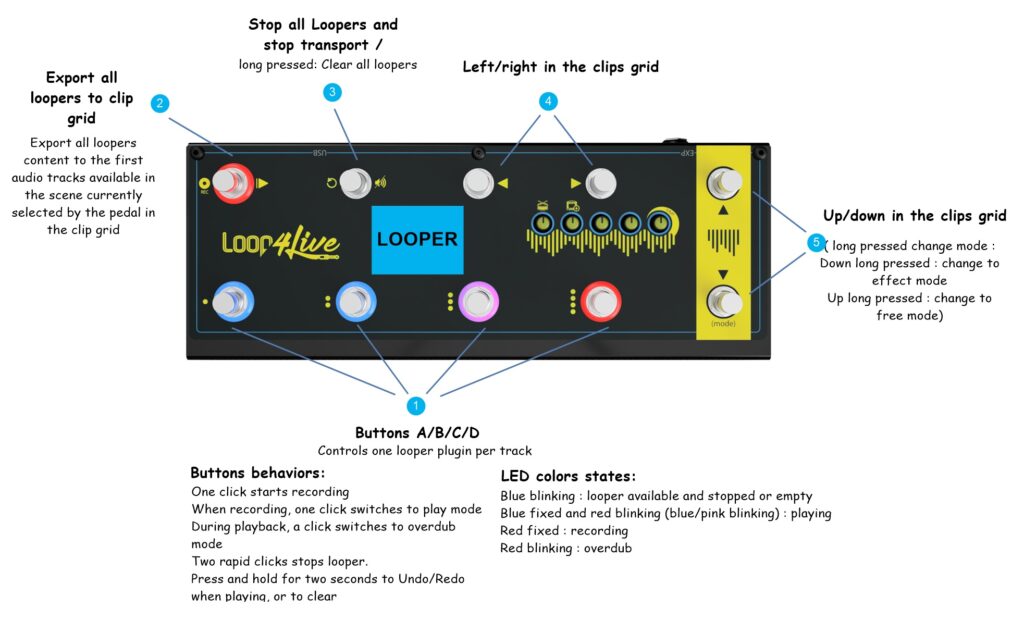
Some features are only available with Ableton Live 12.1 or higher, namely:
– Exporting looper content to the clip grid.
– The Stop All Loopers and Empty All Loopers buttons.
The A-B-C-D buttons still allow you to stop loopers one by one, as well as empty loopers one by one.
Exporting loopers to the clip grid:
Exporting the contents of loopers allows you to place clips recorded via the looper in the clip grid.
Please note that exporting can only be done to audio tracks, not MIDI tracks.
When exporting is initiated, the clips are exported to the first available audio tracks.
Good to know: If transport is started, the looper plugin will lock its tempo to it (the looper will stop recording when it reaches the desired number of bars). However, if transport is not started, the looper plugin can assign the tempo to the session if its “Tempo control” parameter is set to “Set & Follow song tempo.” You will then need to stop recording via the pedalboard when the number of bars is reached in order for the tempo to be set and assigned to the session.
Note that pressing the “Stop all loopers” button on the pedalboard will stop the transport so you can simply start again from scratch.