

Notifications
Clear all
Tips & Tricks
1
Posts
1
Users
0
Reactions
6,017
Views

Topic starter
control Guitar Rig 6 with the Loop4Live and Ableton
This tutorial will show you how to control the Guitar Rig 6 plugin via Ableton Live and the Loop4Live pedalboard in free mode.
We'll be able to :
- use the pedalboard buttons to activate/deactivate effects
- use the expression pedals to modify Guitar Rig parameters (gain, delay, Wha, frequencies, ...)
- change presets when launching scenes in Ableton
- navigate into Guitar Rig presets with Loop4Live up and down buttons.
To setup Guitar Rig in Ableton Live, you can follow this video tutorials to detect VST plugins:
English : https://youtu.be/T96USwXA4Y0
French : https://youtu.be/USvvaVgCfzQ
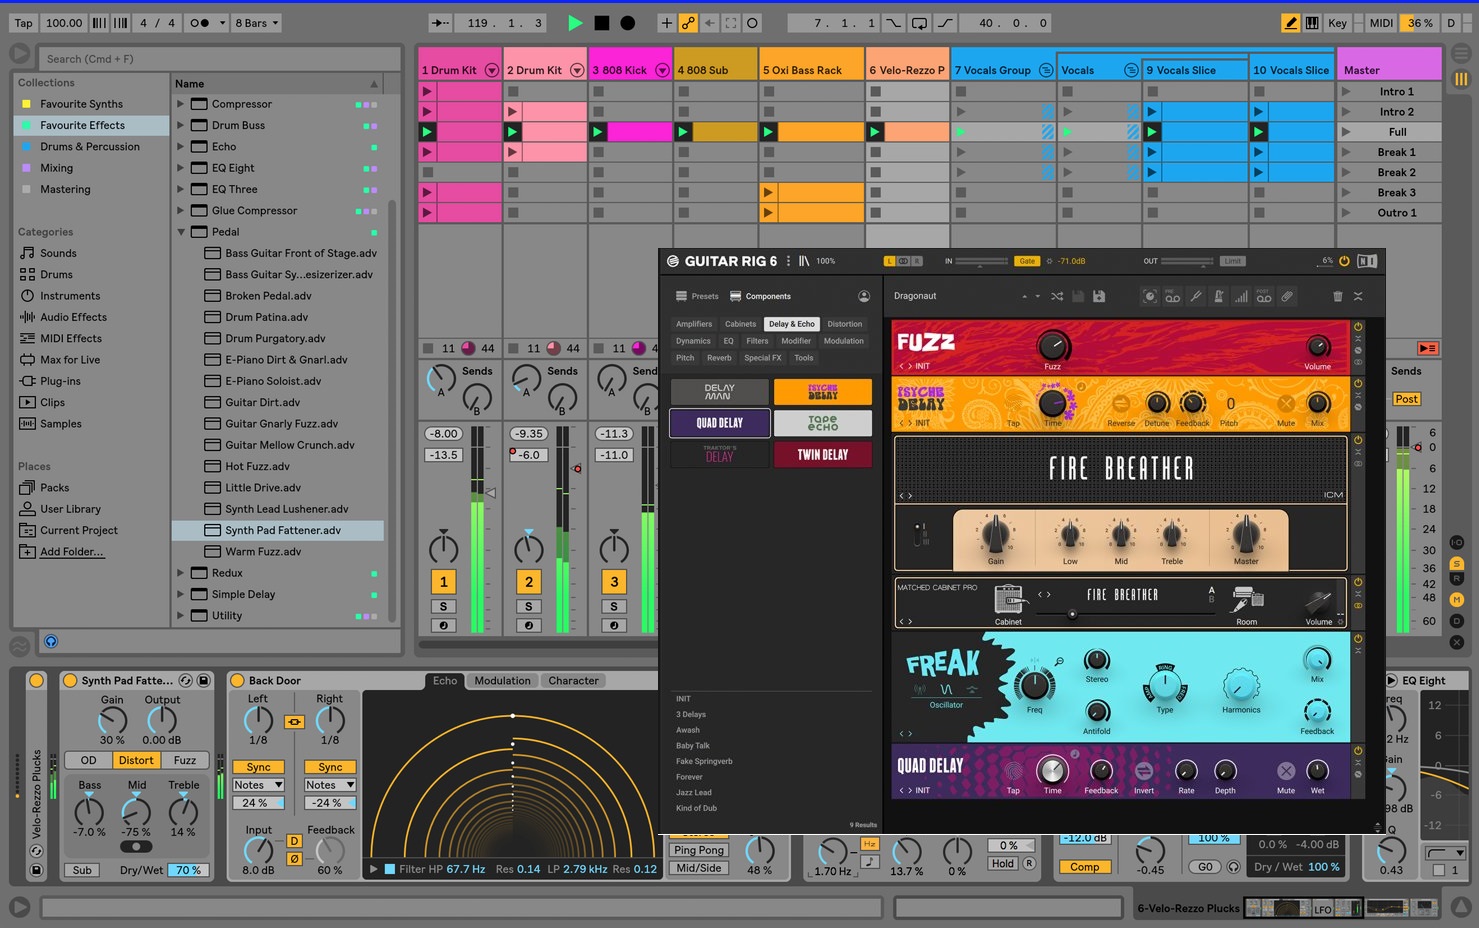
1. Controlling Guitar Rig parameters with the Loop4Live
We will use the Guitar Rig Macros in order to have a homogeneity of controls in Ableton. Macros allow you to assign a global control to any parameter in the rack. Thus, if we change the Guitar Rig preset, the midi notes assigned to the macro will be the same regardless of the preset selected.
The macros are saved with the presets in Guitar Rig. The default presets are read-only and cannot be saved. We must therefore duplicate the presets as user presets. To do this, we open a preset that interests us and click on the save icon as shown below:

We indicate a new name for this preset.
We then display the macros on the presets:
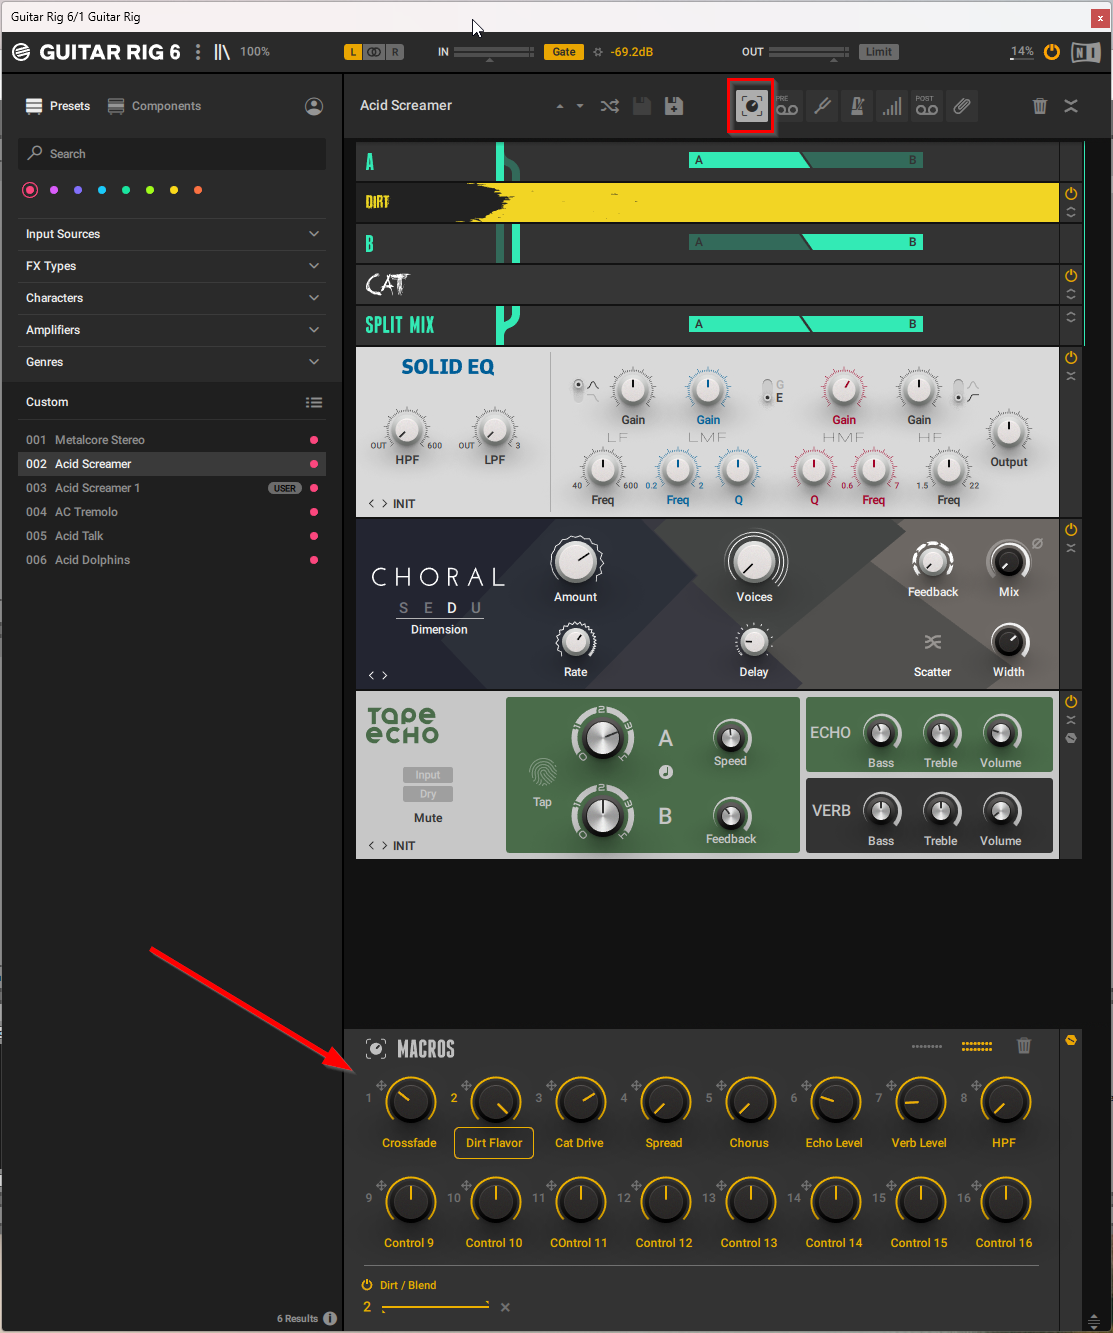
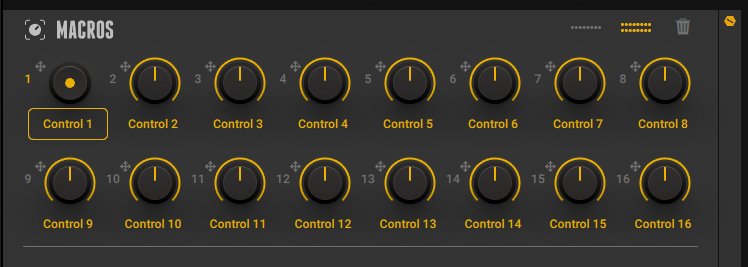
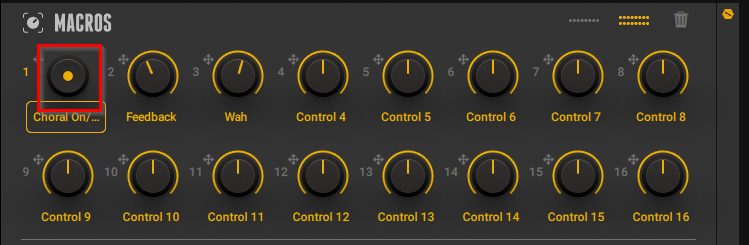
Here there are already macros defined. We are going to free all the controllers to customize according to our desires:
We delete the assignments of the existing macro by clicking on the trash can:
For our example, we will create 3 controls:
- The first control will turn on/off a stage of the rack
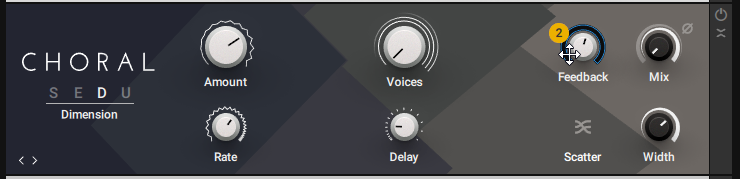
- The second control will modify the amount of feedback of the CHORAL module
- The third control will control a wha-wha
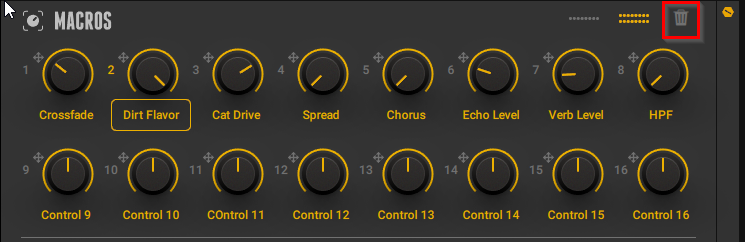
After deleting the existing macro, we are in the following situation:
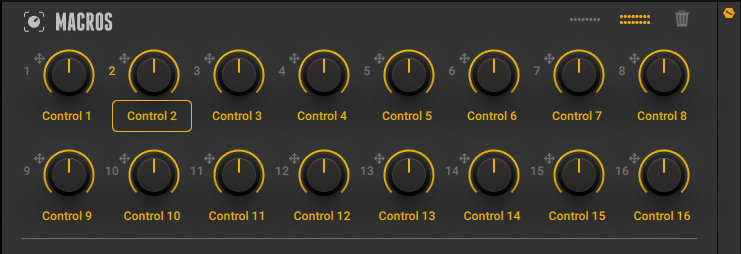
We no longer have any control related to the parameters of the racks.
We turn the first control into a knob instead of a fader. We right-click on the first controller and select "Toggle Knob/Button Mode":
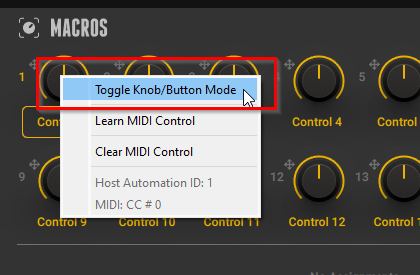
Ceci fait apparaître le bouton :
We will drag the first controller by selecting the number  and dragging it to the on/off button of the rack level that interests us
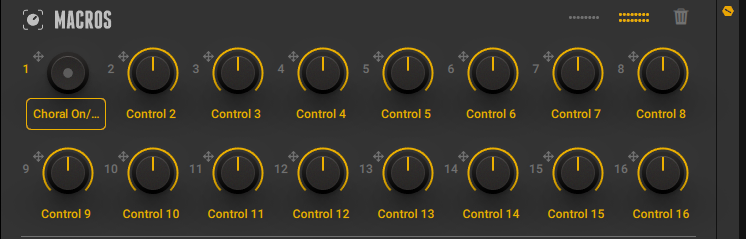
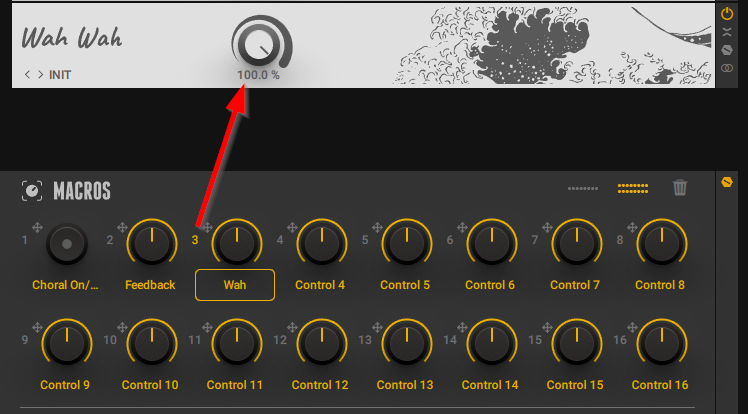
We take the opportunity to change the name of the controller by double clicking on it:
The second controller will be the feedback control of the CHORAL stage. We select 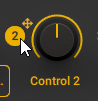 and drag it to the feedback parameter:
The last controller will go on the wha-wha :
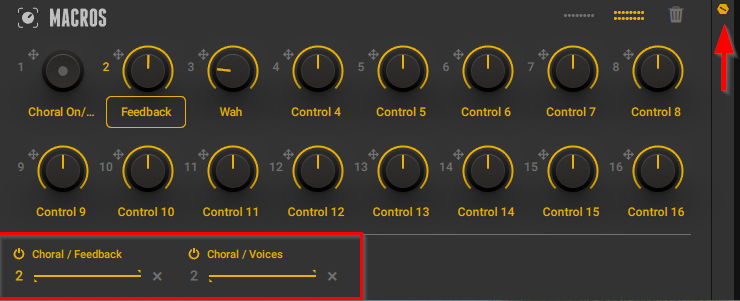
Try to move the first 3 controllers of the macro, you will see that they activate the associated parameters.
Note, we have the possibility of assigning several parameters to a single macro controller: drag the controller to several rack parameters and these will appear in the lower part of the macro (expert mode must be activated, arrows below):
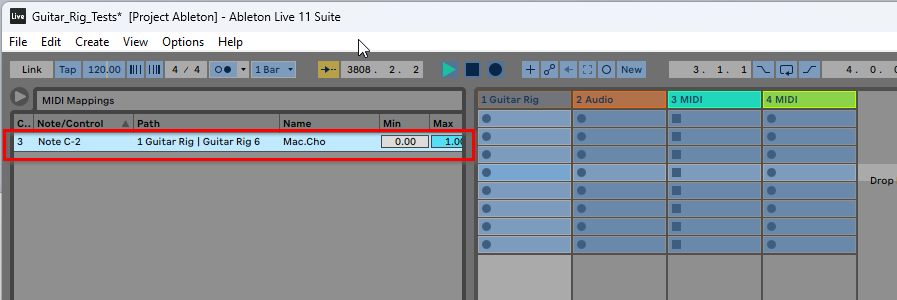
In Ableton, we will now assign these macro knobs/faders to midi notes sent by Ableton and controlled via Loop4Live :
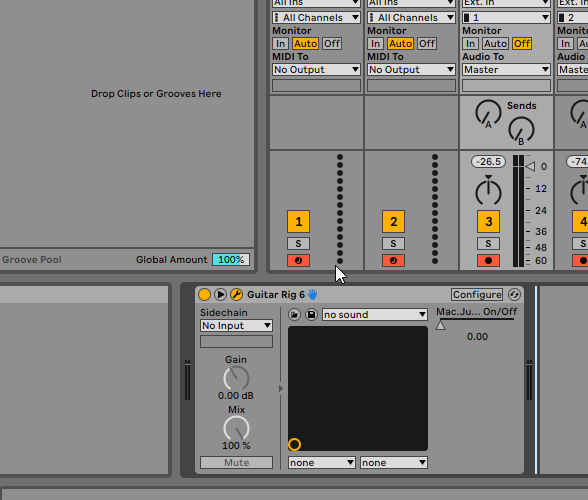
The first step is to make the Guitar Rig button known to Ableton. We click on "configure" in the Guitar Rig 6 effect of Ableton:
We click on the first macro controller on the Guitar Rig interface:
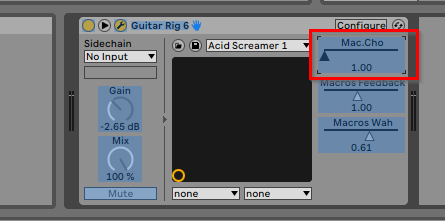
This makes the controller appear in Ableton :
In this case, this makes 2 controllers appear, since pressing the On/Off button effectively stops/starts the stage. We will keep only the controller beginning with "Macro".
We do the same for the other 2 controllers (feedback and Wha-wha):

We will always keep only the controllers beginning with "Macro".
Then we are going to "midi map" these controllers in order to assign them to the Loop4Live buttons and to the expression pedals that interest us. We first switch the pedalboard to free mode by pressing the "up" button for more than a second. We then switch to " midi map " mode in Ableton :
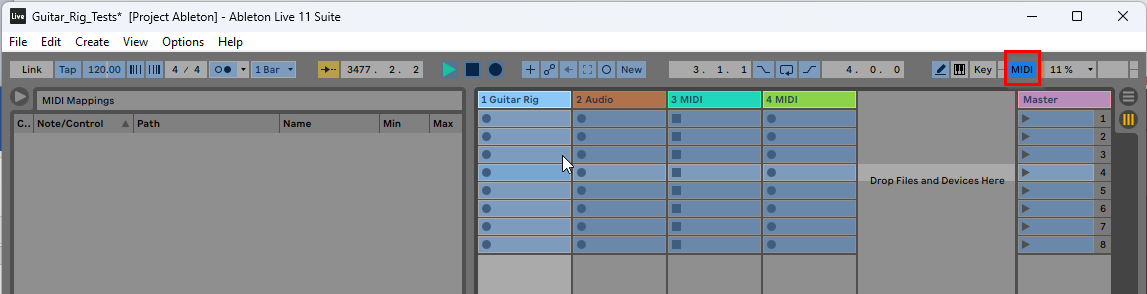
We click on the controller of the effect in Ableton :
Ableton now waits for a midi signal to be sent to assign it to the controller. We press the button of the Loop4Live that interests us (still in free mode).
This brings up the midi assignment :
We select the second controller and move the first expression pedal. Finally, we select the third wha-wha controller and move the second expression pedal. All the midi assignments are now available:
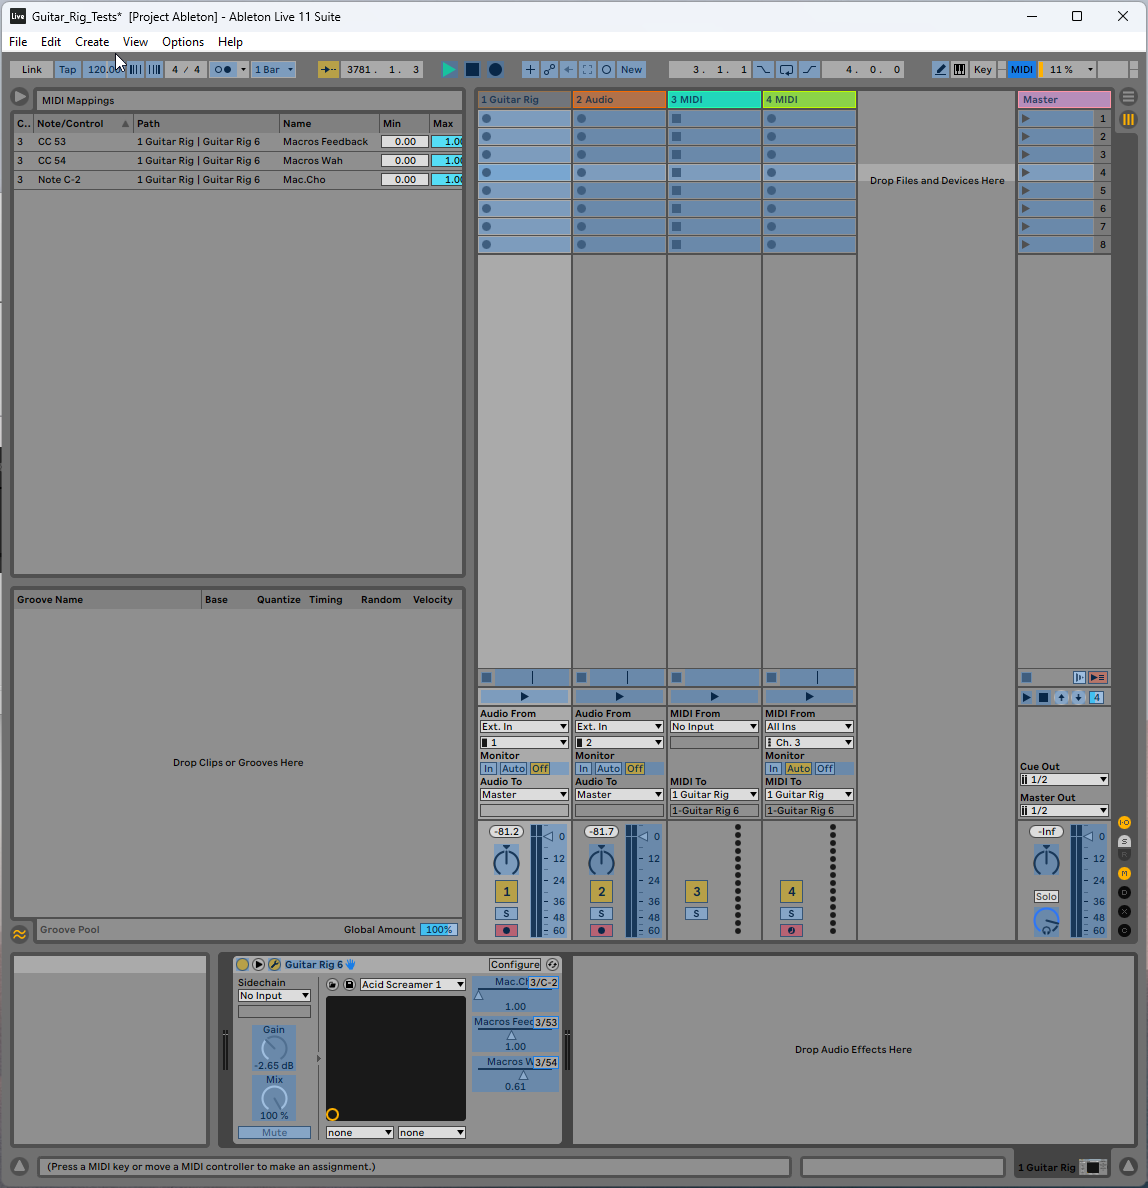
Get out of the midi map mode and you can now control the Guitar Rig effects from the Loop4Live!
Don't forget to save your work on both Guitar Rig (Macros) and Ableton (controls).
2. Change preset when launching a scene in Ableton
We will send midi signals to Guitar Rig through Ableton. As soon as a clip with a particular midi signal is launched (at the start of a scene, for example), the preset will change in Guitar Rig.
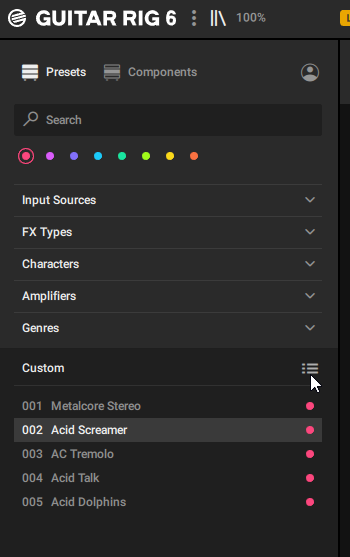
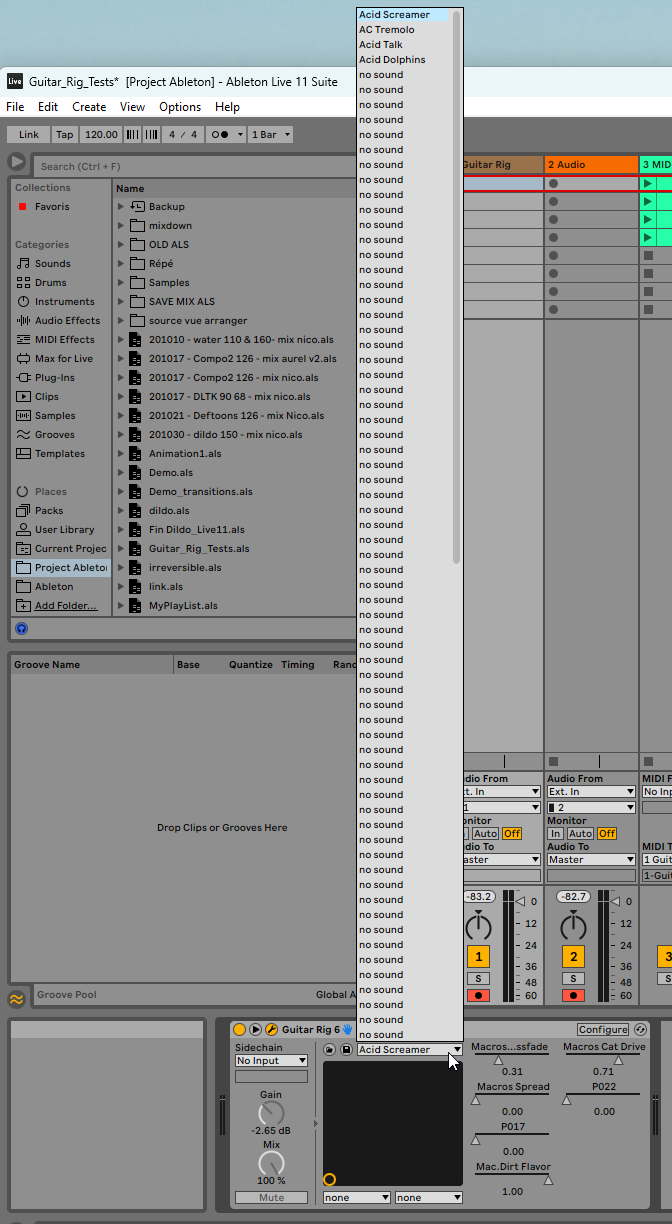
Note that there is a limitation in Guitar Rig when it comes to preset filters: you will have to be in "Custom" mode, so you can choose the order of the presets in the list:

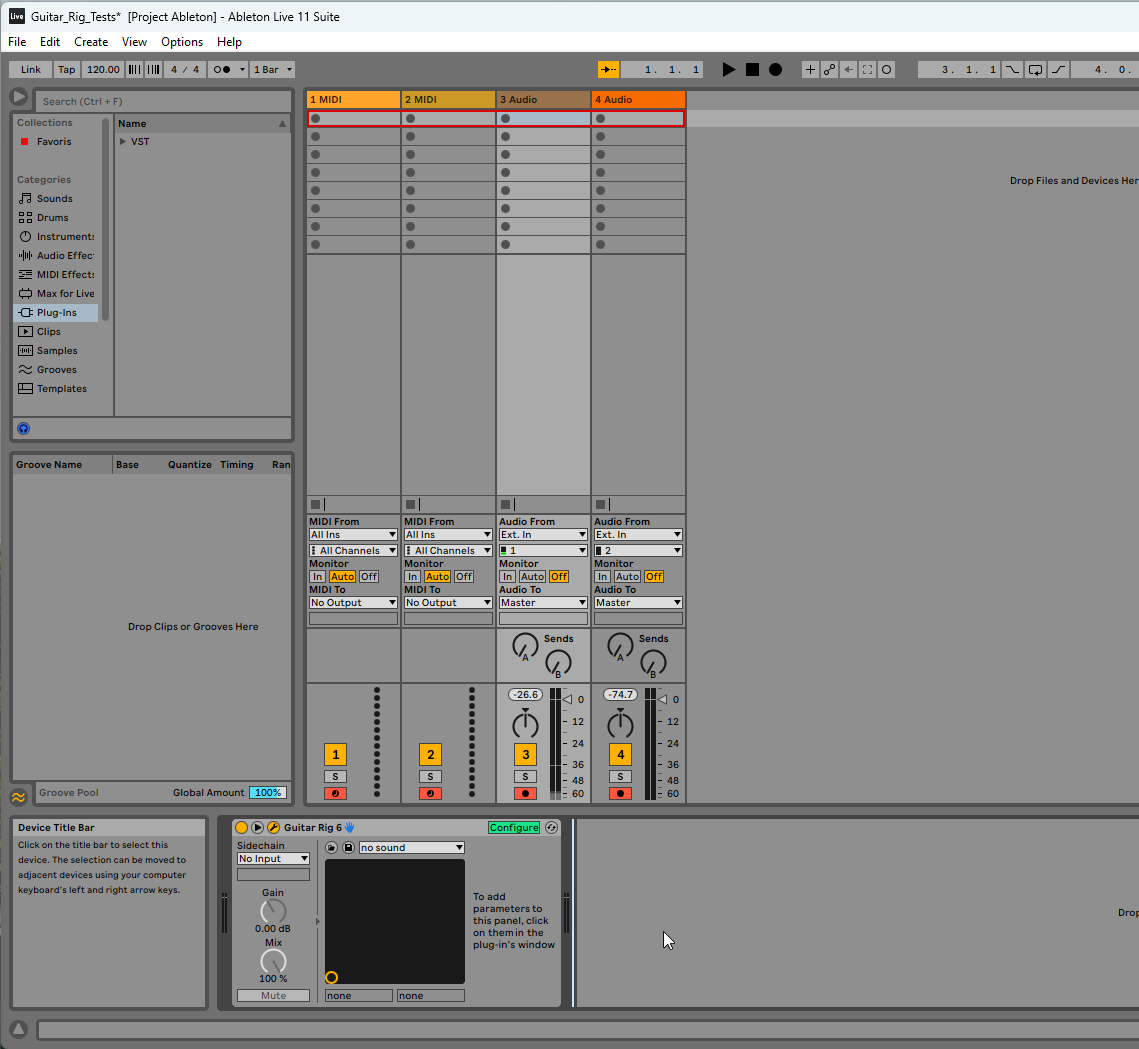
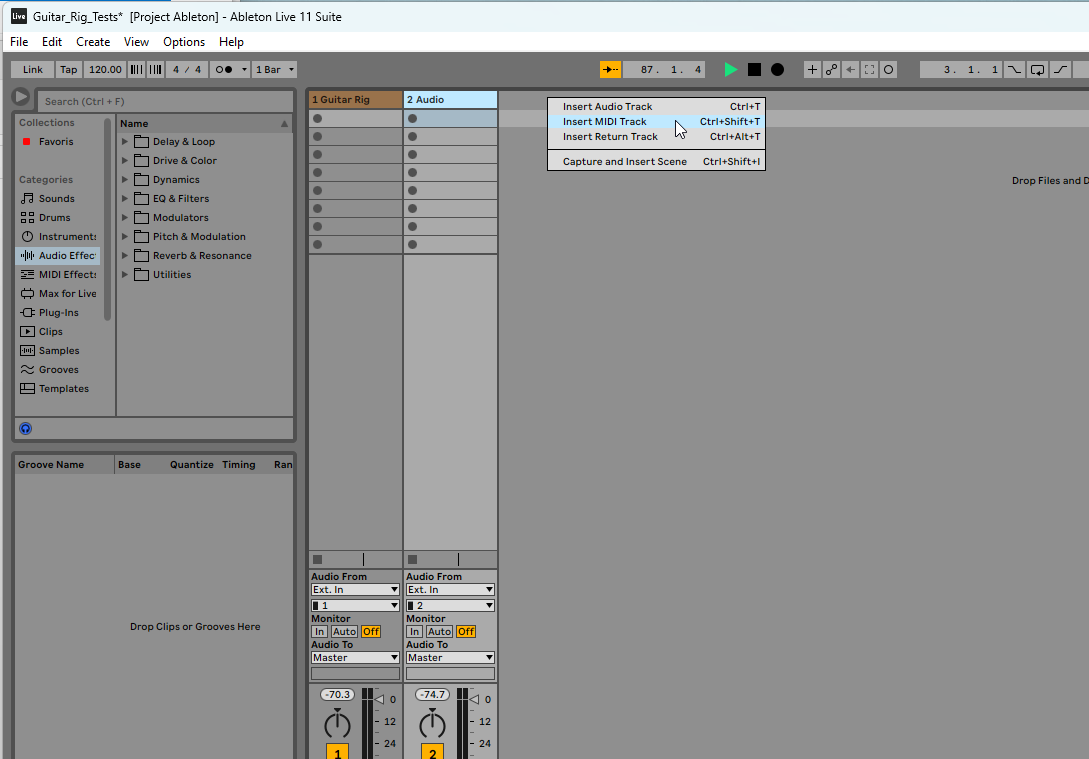
First of all, we create a new midi track that will be dedicated to sending the midi signals for changing presets to Guitar Rig.
We right-click on a new column in Ableton and choose "Insert MIDI Track":
We send the midi signals of this new track to the Audio track that contains the Guitar Rig plugin (named 1. Guitar Rig in this example). In "MIDI To" we select the track :
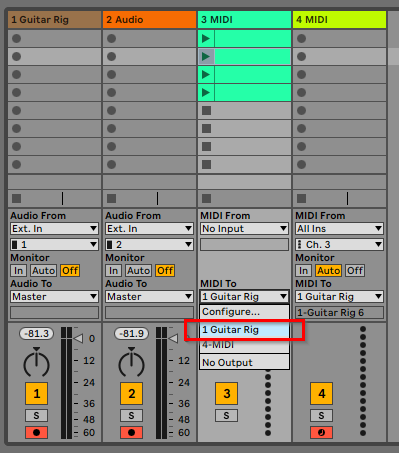
This automatically selects the Guitar Rig plugin when receiving MIDI signals:
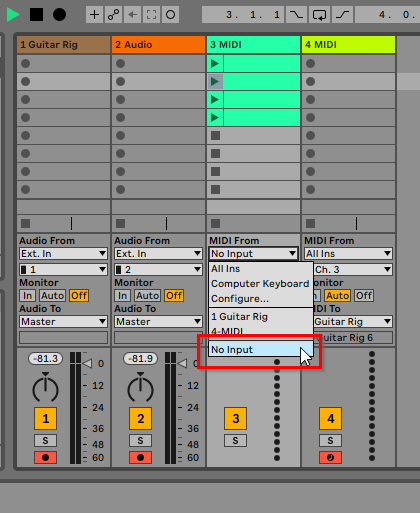
In "MIDI From" select "No input":
In Guitar Rig, go to the preferences:
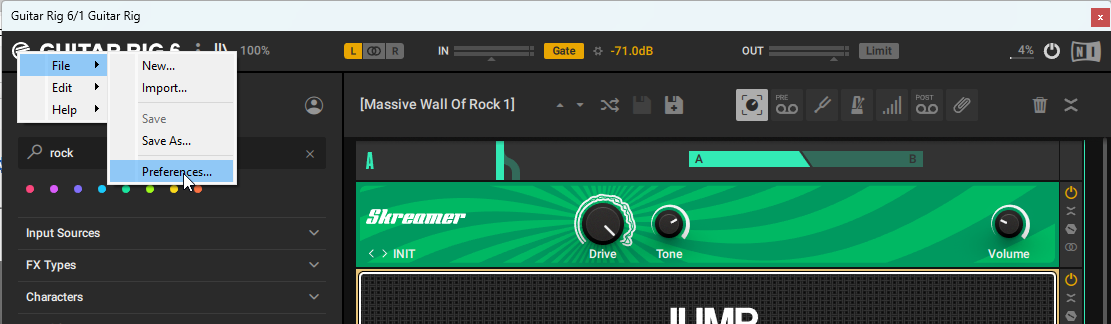
Check in the MIDI tab that the MIDI Channel is set to "Omni":

The list of presets is available in Ableton via the drop-down list present in the plugin (be careful to be in Custom mode when selecting presets in Guitar Rig otherwise the order of the presets will be incorrect):
We create an empty midi clip in a cell of the clip grid:

Go to the details of the clip in the dedicated tab:
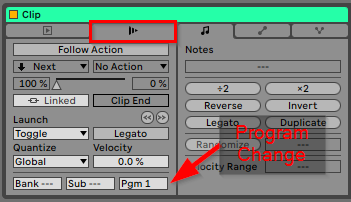
We will indicate that the midi message corresponding to this clip is a "program change" with the value corresponding to the position of the Guitar Rig preset in the list:
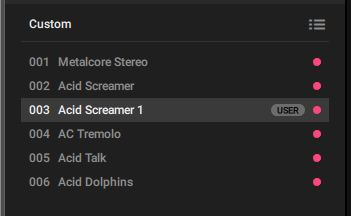
Preset 002 Acid Screamer corresponds to program change 1, preset 003 Acid Screamer 1 corresponds to program change 2, preset 004 AC Tremolo corresponds to program change 3, preset 005 Acid Talk corresponds to program change 4 and preset 006 AC Acid Doplhins corresponds to program change 5, etc
Be careful, the first preset is not selectable (Guitar Rig bug?): you will have to put a "garbage" preset in the first position.
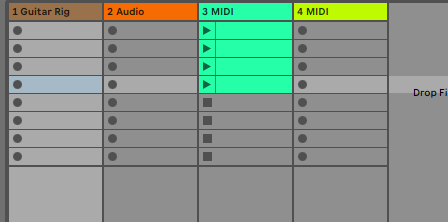
Create several midi clips on different scenes and with "program change" values corresponding to your preset wishes:
When you launch one of these clips, the preset selected in Guitar Rig changes! 🍻
3. Navigate through the presets with the up/down buttons of the Loop4Live
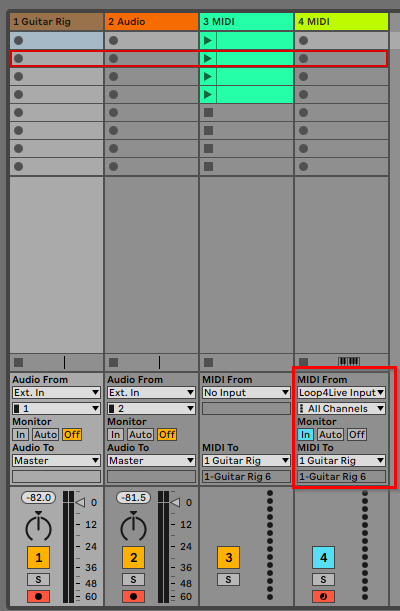
You can navigate the Guitar Rig presets with the up/down buttons of the pedalboard in free mode. To do this, assign dedicated notes to the up and down buttons in the free_mode_midi_map.ini file contained in the Loop4Live remote scripts (see paragraph 7B. The Free Mode of the manual). Next, create a new midi track in Ableton in order to forward the midi messages from the pedalboard to Guitar Rig. In this midi track, select "Loop4Live Input" in the "MIDI From" section and "Guitar Rig" in the "MIDI To" section. Also check "In" in the "Monitor" section. The MIDI signals from the pedalboard are thus transferred to Guitar Rig.
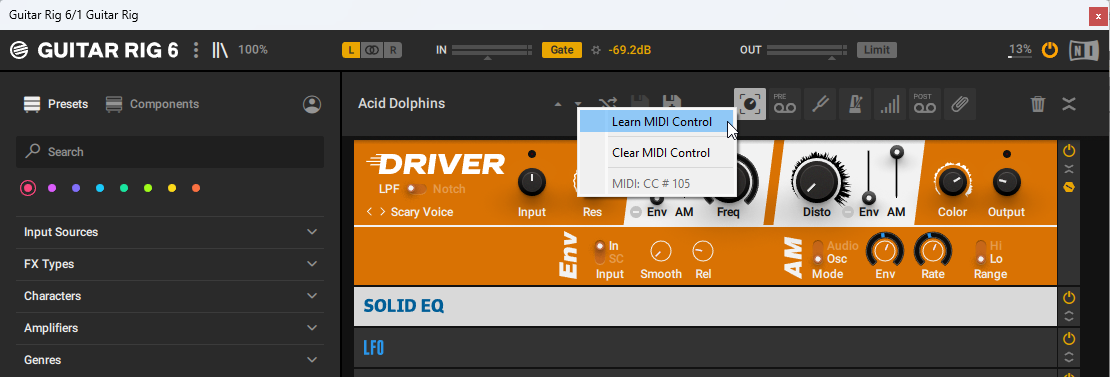
In Guitar Rig, right-click on the "preset up" button and select "Learn MIDI Control". Then activate the up button on the pedalboard (set to free mode). Do the same for the "preset down" button.
Now that Ableton is transferring MIDI signals from the pedalboard, you can assign what you want in Guitar Rig using MIDI Learn to control all the parameters of the racks.
Posted : 26/01/2023 6:20 pm